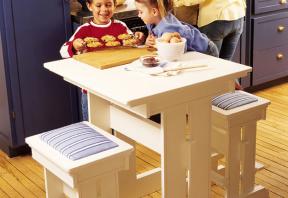
Finding space in the kitchen isn’t easy, whether you’re talking pots and pans, flour and sugar, or tables and chairs. I designed this compact table-and-stool set to make it possible to sit and eat in the kitchen without robbing the room of its much-needed space. I had a compact design in mind when I built the stools so that they can nest under the table and thus out of the way. The entire set can be stored against a wall.
Kitchen tables and stools have a reputation for being difficult to build, but I’ve discovered that it doesn’t have to be that way if you take time to refine the design. That’s what I’ve tried to do here. The joinery is simple but strong. The lines are clean and contemporary. All of the materials-even the upholstery-are inexpensive and easy to find.
To make this project come together well, diligent planning and stock preparation are key. I usually sand all of my stock to paint-ready smoothness before I cut it to size, and this set is a perfect case in point. After final assembly, there are plenty of nooks and crannies that you’ll never get a chance to smooth properly otherwise. You’ll save time sanding and get better finished results if you sand first. I recommend running a belt sander, equipped with 120-grit paper, over all the stock you have before cutting your stock to the dimensions listed.
Time
Multi-Day
Skill
3
Cost
3
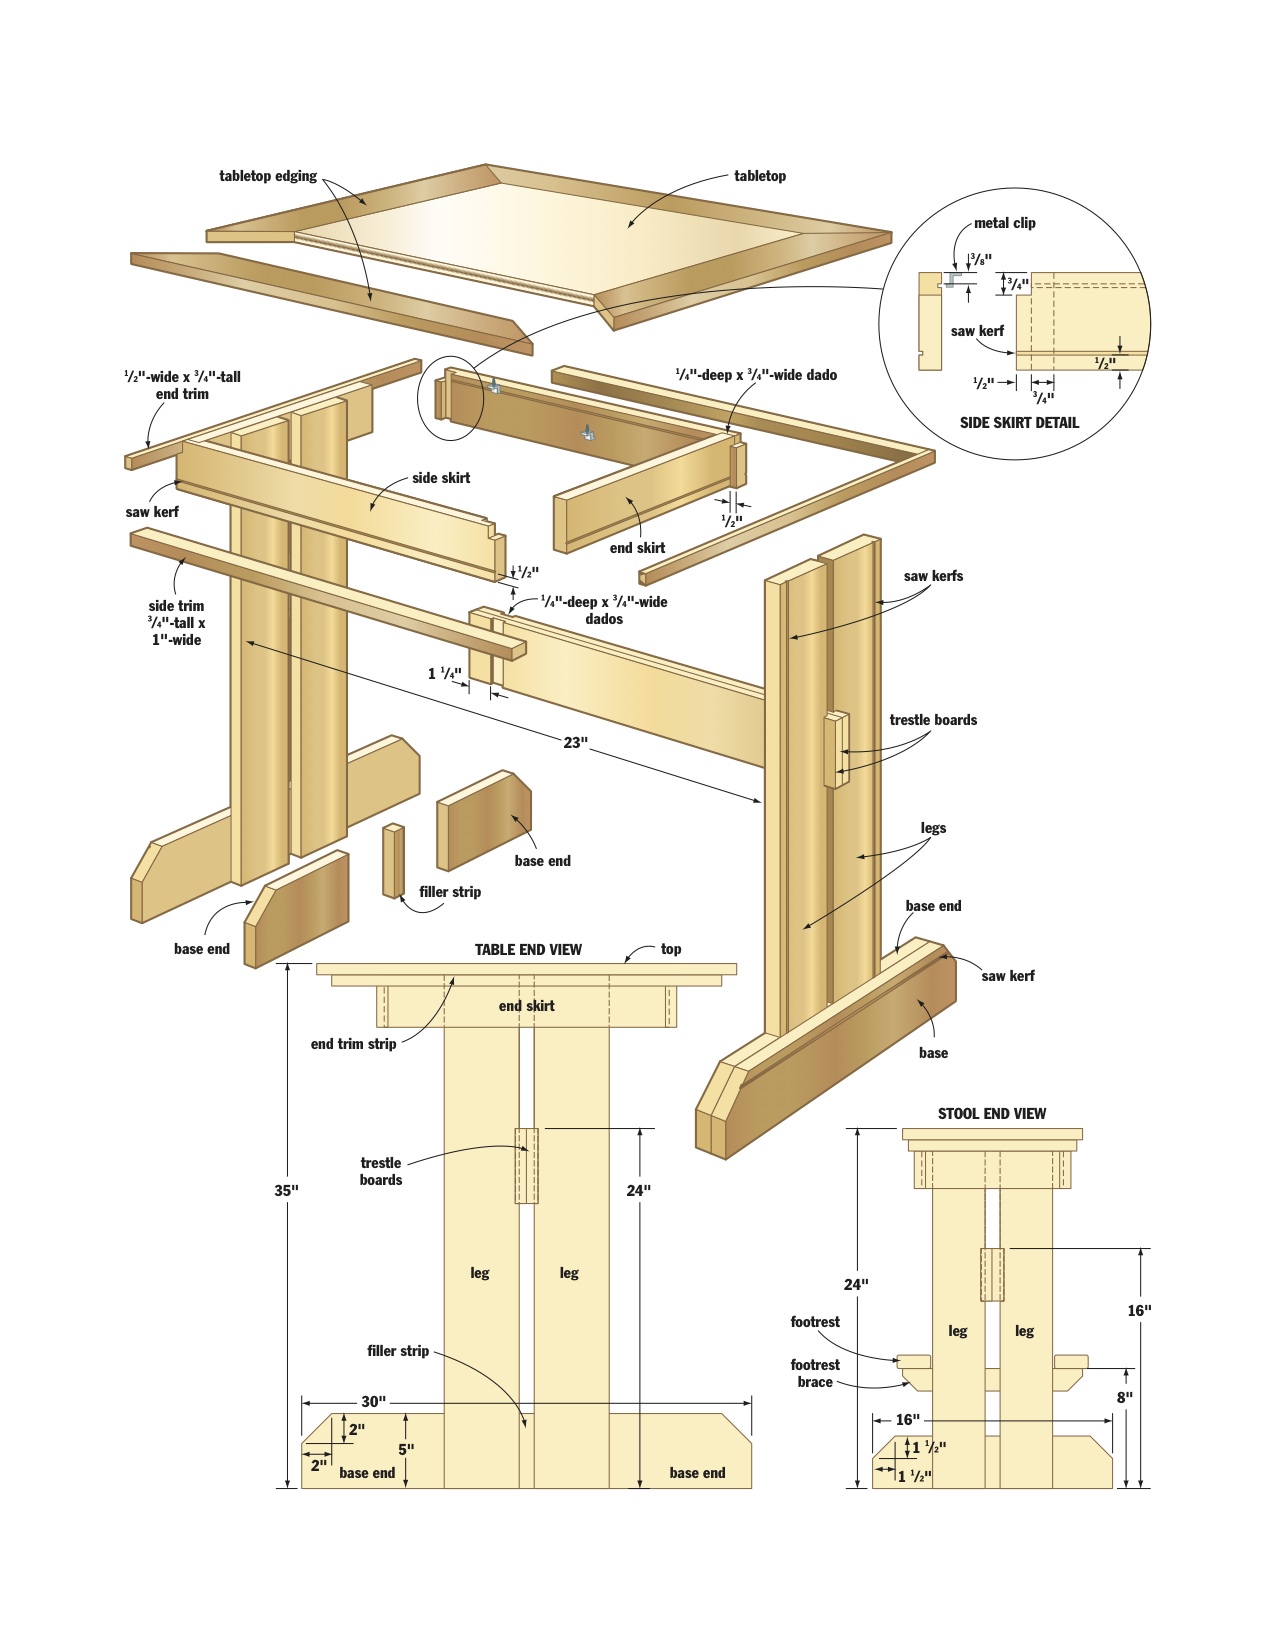
The table calls for larger pieces of wood than the stools, so it makes sense to begin here. This way you're better able to make good use of your table “scraps” when you're ready to build the stools.
Cut the legs, base, end skirts and side skirts to exact size. Leave the base ends and filler strips for now. The parts you've just cut require a decorative 1/8"-deep cut (called a “saw kerf”) along one surface, 1/2" in from the edges. This is an aesthetic addition, designed to add a bit of detail and shadow to the final painted project. Cut kerfs into the outside surfaces of each of the parts, one cut in each piece. Start with the outside edges of each leg, then cut another set of kerfs along the bottom outside surfaces of the skirt parts. Finish up with more kerfs along the top edge of the base members. When you're done, sand the inside edges of the kerfs to remove the sharp edges.
Now cut the two horizontal trestle boards to size. When they're finally joined together later, they'll look like a single piece of 1 1/2"-thick wood. But right now, prepare 1/4"-deep, 3/4"-wide dado grooves across the outer surfaces, 1 1/4" from each end, to fit the leg edges. Measure 24" up from each leg bottom end and, using a pencil, mark a line on the inside edge. Use glue and two #8 x 1 1/2" screws per joint to fasten the top edge of one trestle board on the 24" mark on each leg edge. Make sure the decorative saw kerfs on the legs face outward. Join the two trestle boards to each other using glue and clamps, resulting in a complete trestle/leg assembly. The legs should be one inch apart at each table end, and 23" apart from one pair to the other.
No matter how careful you are about vacuuming your workshop before finishing, airborne dust particles will inevitably settle on wet paint or urethane before it dries. These unwelcome specs will cause small, disappointing bumps in the finish when it dries, although there is a way to get rid of them. The trick: make polishing the final step of your finishing process. Wrap a piece of 600-grit sandpaper around a block of scrap foam and remove any bumps by gently rubbing all flat surfaces with a few strokes. Use the paper freehand for curves and tight spots, but don't overdo it. All it takes is two or three strokes in a given location. Next, place a 6" x 6" square of fine rubbing pad against the Velcro surface of your random-orbit sander pad, then push the pad against the work and switch it “on.” The more you power-polish, the greater the sheen you'll get. In just a few minutes, your tabletop will shine like the hood of a new car. -Steve Maxwell
Next, cut two inches off the top corners from each base piece, just to add to the design. Centre the trimmed base pieces onto the outside surfaces of the legs, bottom edges flush, and secure the base pieces with glue, clamps and one-inch counterbored screws. Cut the base ends and filler strips to size, then cut off the top corners of the base ends in order to make them mate perfectly with the main base parts you trimmed earlier. Glue and clamp all six parts to the inner surfaces of the bases, creating 1 1/2" in thickness.
Take the end and side skirts that you cut to size and make a saw kerf that is 5/16"-deep, located 3/8" from the top edge along each inner surface of the skirt parts. These aren't decorative, but will be used later to attach the tabletop, fastened with metal clips made for the job. Note that this saw kerf is on the opposite surface and near the opposite edge of the decorative kerf cuts already made. Just to be safe, have your clips on hand before cutting these kerfs. This way you can alter the kerf location if your clips are different than mine.
The skirts form a kind of frame. At this stage, prepare the joinery. First, make a 3/4"-wide, 1/4"-deep dado across the inside surface of each side skirt part, 1/2" from each end. Next, cut a 1/2" x 3/4" notch out of the top edge corners of the side skirts only. Join the dadoed ends of the side skirt into the ends of the end skirts, using glue and finishing nails to create a four-sided frame.
The stool-building process is similar to the table. Begin with the two trestle boards. Cut them to size, then prepare a dado 1 1/4" from each end to accommodate the leg edges. Next, join individual trestle boards 16" up from the bottom of the legs, then join the trestle boards face to face to form the completed trestle/leg assembly. These steps follow the same process as the table, so the lessons you learned before should come in handy.
Next, cut two base parts to size and trim 1 1/2" off the top edge corners to fit with the rest of the design. Centre these on the legs, bottom edges flush, and fasten with glue. As before, cut the base ends and filler strips to fit directly behind the backside of the base parts. Glue and clamp these parts and let them dry overnight.
Make dados across the inside surface at the ends of each side skirt, 3/4"-wide by 1/4"-deep and 1/2" in from the ends. Glue and nail the ends of each end skirt into the dadoes that are in the side skirts to form a smaller version of the table frame you made earlier.
Make wooden plugs almost invisible by choosing the tapered type, which have edge-grain on their top surfaces instead of those with end-grain. You can buy edge-grain plugs or you can make your own with a drillpress plug cutter. Either way, the ones with edge-grain are superior because their absorbency better matches the surrounding wood, so the plugs disappear nicely under several coats of paint.
Cut the seat base and seat base edge parts to size, then mitre the ends of the edging. Next, glue and nail these to the edge of the plywood base, which together make the 12" x 15" seat base. Centre this on the skirt and screw the seat base to the top edges of the skirt.
Prepare the top frame parts now. Mitre the ends and use biscuits or dowels and glue to make the 13" x 16" seat top frame. Employ the services of a jigsaw to cut the corners to a 5/8" radius, then roundover all outside edges to a 3/16" radius. Centre this frame on top of the seat base and glue it down.
Once you've reached this stage, you can slide the skirt frame and seat base unit over the top ends of the legs and clamp them in place, square to the legs. Join the legs to the skirt from the inside surface with three 1 1/4" screws per joint.
Cut the footrest braces now, then saw a one-inch corner from each bottom end. Centre the braces onto the inside surface of a pair of legs, eight inches up from the bottom. Glue and clamp each brace in place, adding one #8 x 2" screw per joint for strength.
The footrests are next, so cut them to size, then round the corners to a 1/2" radius. Round all of these edges to a 3/16" radius. Position the footrests onto the braces and secure them with glue and one #8 x 1 1/2" screw per joint.
Cut the tabletop and tabletop edge parts to size, mitre the ends of edging, then glue and clamp the wood strips to the veneered plywood. The final overall top size should be 28" x 28". Round the corners to a 5/8" radius, then roundover the top and bottom edges to a 3/16" radius with a router. Place the tabletop upside down on your work surface.
The tabletop trim adds visual thickness to the project. This is the time to install these parts. Glue and nail the side and end trim components to the underside of the tabletop to give the appearance of double thickness. Tack parts in place, first with no glue so you have the option of adjusting the strip location later, if needed. Start with the 1/2"-wide end strips, placing them 1/2" in from the table end edges. The one-inch-wide side trim strips are located one inch in from the table side edges.
Place the tabletop onto the skirt frame you completed earlier, centre it and check for a good end trim fit. The end trim parts should fit neatly along the end skirts, also filling the notches of the side skirts. When you've adjusted everything, remove the trim, add glue and reattach the trim for good. Mount the top to the skirt with about eight metal tabletop clips.
Your choice of fabric for the stool seats can radically alter the look of this project and how it looks in your kitchen. Add calm to a crowded space with light tones and simple patterns-or no pattern at all. Give a monotone kitchen a splash of colour with bright solids or large prints. Shop for fabric, as well as the one-inch foam, at any general fabric store. But choose strictly uphostery material-it is more durable than other fabrics. Accidents do happen, so buy extra in case you need to replace the fabric someday. To deflect some of those dining spills, consider applying a liquid-repelling coating such as Nikwax (available online at www.mec.ca or in sporting-goods stores) or spray on Scotchgard Fabric Protector, before you install the upholstered seat.
Attention to detail is a must for a good paint job. Cover all screw holes with tapered wooden plugs and trim them flush. Fill all nail holes and other gaps or imperfections. You'll also need to hand-sand all sharp edges using 120-grit paper, but don't overdo it; a few strokes on each edge does the job.
Apply two or three coats of a nice colour of interior latex paint, sanding between coats for smooth results.
When the brush work is done, cut the upholstery base for your stool. Trim a piece of one-inch-thick foam 1/4" narrower and shorter than the upholstery base, then place the foam and wood upside down on fabric that's draped over your workbench. You'll get best results if you also place a piece of upholstery felt between the foam and fabric. This allows the fabric to slide over foam during use, extending fabric life. Pull the fabric over the plywood base and, on the back surface, tack it in place with a staple gun. The upholstery base is made smaller than the frame that surrounds it, so it should drop right into place. Secure the base with screws driven up from the bottom.
Your trio should now be ready for its kitchen debut.
| Part | Material | Size (T x W x L*) | Qty. |
|---|
Table |
|||
|---|---|---|---|
| Legs | pine | 3/4" x 5" x 34 1/4" | 4 |
| Trestle board | pine | 3/4" x 5" x 27" | 2 |
| Base | pine | 3/4" x 5" x 30" | 2 |
| Base ends | pine | 3/4" x 5" x 9 1/2" | 4 |
| Filler strips | pine | 3/4" x 5" x 1" | 2 |
| End skirts | pine | 3/4" x 3 1/4" x 19" | 2 |
| Side skirts | pine | 3/4" x 3 1/4" x 27" | 2 |
| Tabletop | veneered ply | 3/4" x 24" x 24" | 1 |
| Tabletop edging | pine | 3/4" x 2" x 28" | 4 |
| End trim | pine | 1/2" x 3/4" x 26" | 2 |
| Side trim | pine | 3/4" x 1" x 26" | 2 |
Stool (quantity listed for one unit) |
|||
|---|---|---|---|
| Seat slats | pine | 3/4" x 3 1/2" x 22 1/2" | 4 |
| Seat supports | pine | 3/4" x 4" x 15" | 2 |
| Leg braces | pine | 3/4" x 3 1/2" x 16" | 2 |
| Centre rail outer layers | pine | 3/4" x 3 1/2" x 4" | 4 |
| Leg/back outer layers | pine | 3/4" x 3 1/2" x 1" | 12 |
| Centre rail inner layers | pine | 3/4" x 2 1/2" x 10" | 2 |
| Leg/back rail inner layers | pine | 3/4" x 2 1/2" x 15" | 2 |
| Backrest | veneered ply | 3/4" x 11" x 14" | 1 |
| Armrests | pine | 1/2" x 3/4" x 12" | 2 |
| Armrest support | pine | 1/2" x 3/4" x 15" | 2 |
| Armrest support | pine | 3/4" x 2" x 13" | 2 |
| Centre rail inner layers | pine | 3/4" x 2" x 16" | 2 |
| Leg/back rail inner layers | pine | 3/4" x 1 1/2" x 12" | 2 |
| Backrest | pine | 3/4" x 2 1/4" x 14" | 2 |
| Armrest | plywood | 3/4" x 8 3/4" x 11 3/4" | 1 |
| Armrest support | upholstery type | 15" x 18" | 1 |
| Armrest support | high-density | 1" x 8 1/2" x 11 1/2" | 1 |
* Length indicates grain direction
Recommendations

canadianhomeworkshop.com is part of the Blue Ant Media
Canada Network
© 2024 Blue Ant Media
More information
Social Media & RSS


Our other sites


No comments
Sorry, comments for this entry are closed at this time.