Install a pressed tin backsplash
It's easy to install, and even easier to clean


The idea of covering walls and ceilings with metal panels painted to look like plasterwork was first seen in North America around the middle of the 19th century. Homeowners used the panels as a low-cost way to imitate the plasterwork that was common in Europe. But the popularity of tin ceilings was relatively short-lived–it dropped off when tin became harder to come by during the First World War as metal production was redirected to the war effort.
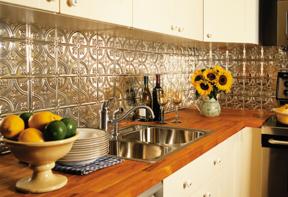
In recent years, tin panels have regained popularity and several companies have started to manufacture them again. We bought the panels for the project from Tin Ceilings, Walls & Unique Metal Work in Mannheim, Ont. The unique texture and durability of these panels made them an excellent choice for a kitchen backsplash. The tin panels are quite thin and easy to cut and install, but you’ll need to get a few tools and materials together before beginning the project.
Handle with care
The tin panels come in 2′ x 2′ squares, and once they’re cut, the edges of the tin panels will be very sharp, so you’ll need gloves and safety glasses when cutting and handling them.
Because the panels don’t have any finish on them, try not to touch the panels with your bare hands because any oil from your hands can discolour the panels.
Before you install them, paint them to look like plasterwork, or if you like, coat them with clear polyurethane to protect them and help preserve their natural, polished-silver look.
Tools required
For this project, you’ll also need tin snips, an electric drill, pliers, a high-tack adhesive and foil tape. Although you could use almost any adhesive to stick the panels to the wall, we used LePage’s Power Grab glue, which is latex-based and, unlike construction adhesive, cleans up easily. The Power Grab’s high initial tack also helped to hold the panels firmly in place. Keep in mind that most latex-based glues require at least one porous surface to stick to, so the surface you apply the tin to must be porous (such as drywall).
If any of the seams between panels are uneven or open, use foil tape (which is extremely sticky) to hold down the edges of the panels temporarily until the glue dries.
Jump to a section
- Page 1 : Installing tin panels is an easy DIY project
- Page 2 : Step-by-step
To leave a comment, please log in


No comments