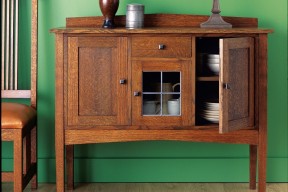
Building an Arts and Crafts sideboard using traditional materials and joinery is often a complex, challenging job, but there are ways to make it easier. I designed this project with common materials and construction techniques in mind. Using veneered-oak plywood for most of the project means more of your shop time is spent building assemblies rather than gluing up and flattening large panels of solid wood. Biscuit and pocket-screw joinery make for square construction, even without dozens of clamps. Selecting European-style hinges for the doors means easy installation and adjustability, and creates the classic look of fitted inset doors without requiring years of experience to get the installation right.
When you’re shopping for materials, choose veneered sheet goods that have a plywood core, not particleboard. Joinery works best with plywood, and the finished sideboard will weigh less. Ensure both sides of the plywood you buy are the same species and grade of veneer—not all veneered sheet goods are the same.
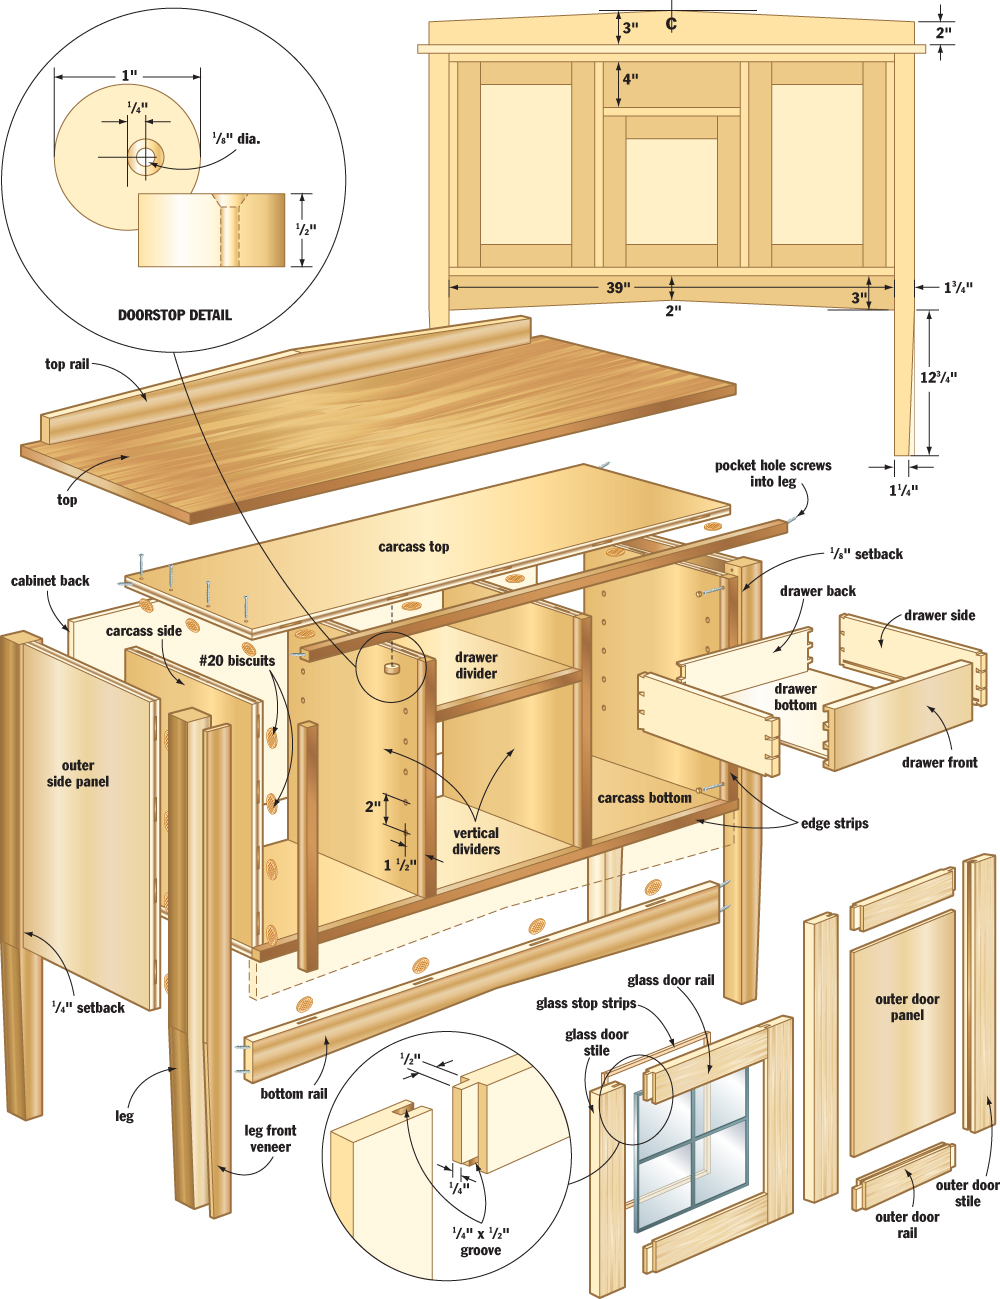
Start building this project by working on the leg assemblies. They include the solid-oak legs and the plywood outer side panels that connect them. Cut and plane four leg blanks to 13⁄4" square, making sure they’re about an inch too long at first. To get the most attractive quartersawn grain running down both the forward-facing and outside face of each leg, I applied shop-cut veneer strips to the leg fronts. Reserve the “natural” quartersawn surfaces for the side-facing sides.
To make the shop-cut veneer I’m talking about, rip 1⁄8"-thick slices off the face of a two-inch-wide quartersawn board. Glue the veneer onto the flat-sawn face adjacent to the best quartersawn face of each leg, paying attention to the eventual location of the leg on the cabinet. (Be sure to put your best foot forward.) Using yellow wood glue, secure the veneer, then top it with scrap wood and plenty of clamps to create a gap-free fit on each leg.
All four legs have a taper on their outside surfaces, which is a nod to the famous Arts and Crafts designs of Harvey Ellis, an American furniture designer and craftsman. To achieve this look, ensure that your veneered leg surfaces all point forward. You’ll have to start over if you try to taper one of the veneered faces. Your aim is to have that treasured quartersawn grain pattern running all the way down to the floor on the two prominent faces of each leg.
There are a few ways to taper square legs such as the ones here. The simplest option? Mark the tapered profile on the legs in pencil, saw off the waste with a jigsaw and then carefully plane the wood down to the layout lines. For a more precise approach, make a tablesaw jig. Here’s how: build a plywood base with a hardwood strip on the bottom that runs along the mitre slot in the tablesaw top. More strips fastened to the top of the ply hold the leg safely at an angle to the tablesaw blade.
Next, create the outer side panels that connect the legs at each end of the cabinet. These must be 121⁄2"-wide x 221⁄2"-tall, with crisp edges. A fine-tooth tablesaw blade made for veneer work will help, but complete all chip-prone cross-grain cuts first, then do the safer rip cuts parallel to the grain of the veneer. This order is best because it increases the chance that chipped end-grain surfaces will be sawn away. Besides using a blade designed for veneered sheet goods, orient the best surface of each piece of ply upward, with the saw blade raised fairly high to minimize chipping. As extra insurance, wrap the area of the cut in blue or green painter’s tape, giving the wood fibres extra support. Take all these precautions and you’ll create flawless veneered edges.
Get the legs and panels to a finish-ready state, and then join these parts with a row of four equally spaced #20 biscuits. As you set up your biscuit joiner, make sure the panels are set back from the side faces of the legs by 1⁄4".
As long as you do your glue-up on a truly flat surface (keeping the inside of the legs facing downward) and apply only mild clamping pressure, you’re guaranteed a square final assembly.
The carcass is made of panels rather than the frames found in traditional designs. Start by rough-cutting your plywood parts about 1⁄4" larger than listed. The edged finished pieces should be 151⁄2" wide. Make top and bottom members 39" long, four vertical dividers 18" long and one 12"-long horizontal divider for the drawer pocket.
You could use iron-on veneer tape to cover the edges of the ply, but you’ll get much better results gluing a strip of solid wood to the front edge of each piece of plywood. I ripped 3⁄4" x 1" strips of solid wood, and fastened them using glue and biscuits. Painter’s tape along the entire edge of each plywood piece minimizes problems with glue on the plywood veneer. Apply the glue very carefully to ensure as little squeeze-out as possible when you clamp.
After trimming the dried edging and cutting the plywood pieces to finished length, rip the boards to finished width.
Now you can drill shelf-pin holes in the vertical dividers. There are a few methods for getting this job done. I made a reusable aluminum drilling jig. I used a 5mm self-centering drill bit chucked into a hand drill to make the holes. Ensure that the locations of the shelf holes don’t interfere with the placement and operation of the Euro-pean-style hinges you’ll install later.
In the two outer compartments, I drilled sets of five holes two inches apart, set 11⁄2" back from the front and back edges. The middle compartment received sets of three holes. I chose odd numbers here simply so I could vertically centre the middle holes of each set on the panel.
Next, cut biscuit slots to join all of the carcass pieces. Each joint requires at least three #20 biscuits, plus screws in the locations shown in the plans. When making the biscuit slots in the face of a panel, e.g., slots for the drawer divider, clamp a straightedge across it to guide your biscuit joiner. Use the horizontal drawer divider as a spacer when you cut the biscuit slots for the two middle verticals. This will ensure that the divider fits well.
Dry-fit the carcass with biscuits in the slots, holding it together with a couple of clamps. With everything temporarily together, use a square to draw guidelines for the assembly screws, then predrill and countersink them.
Take everything apart and give the insides a finish sanding, but be careful: most veneer is less than 1⁄64" thick; it’s easy to wear through and there’s no way to fix it. Now it’s time to put everything back together, but this time with glue. I used two-inch-long particleboard screws for the final assembly. Their coarse threads really grab in plywood. You’ll also find that once the screws are tightened down, you’ll have little need for clamps. Check that your carcass is square before setting it aside to dry overnight. Leave the back panel off for now. You will finish it separately before you install it.
The doors I made use simple stub tenon construction: short tenons in the rails mate with the panel grooves in the stiles. The finished rail and stile stock is 3⁄4" thick and two inches wide. Mill up enough extra stock to make some test joints as you adjust your machinery. Cut 1⁄4"-wide x 1⁄2"-deep grooves with a dado blade on your saw. To centre the grooves, run each face against the fence, taking two passes to create each groove.
Leave your dado blade on the saw to cut tenons on the ends of the door rails, sneaking up on their thickness on scrap stock until the fit is right with the grooves you have already prepared. When making your doors, measure each opening and build your doors accordingly. Build them just 1⁄16" smaller in both directions. Your aim is to plane them down later to fit perfectly in the cabinet.
Prepare a 1⁄4"-thick plywood or solid-wood panel to fit the grooves in the two outer doors, then glue the frames together around them. The centre door has a glass panel, so glue the stiles and rails together with nothing between them for now; you’ll install the glass later.
When the doors are completely dry, bore a 35mm pocket for the European-style hinges on the back faces of the stiles on one side of each door. It’s possible to do this job with a handheld drill, but results will be better using a drillpress and a special bit designed for this application. I drilled hinge holes 21⁄2" from the top and bottom of each door. Install the hinges in the door, then drill pilot holes for the screws that anchor the other half of each hinge at the proper location in the cabinet. Temporarily install your doors and adjust the fit (including trimming them smaller to fit the openings if necessary) until you are happy with their appearance and operation.
The middle door will accommodate a glass panel. There are two simple methods for turning the groove you milled earlier into a rabbet for glass. After the glue has dried you can use a bearing-guided rabbeting bit on a router table to gradually remove the wood, cleaning up the corners with a chisel.
Alternatively, you could use a tablesaw to cut away the wood, lowering the door onto the spinning blade to make plunge cuts. Set the blade height and the fence to remove the backside of the groove. Mark the fence with a pencil to show where the blade first begins to rise above the saw table and where it also sinks below on the back side of the cut. Lower the back of the door onto the spinning blade while keeping it tight against the fence, then push the door until you reach the pencil mark nearest you. Lift the door off, then use a small handsaw and chisel to remove the strips of wood from the back of the door. Done carefully, there’s little chance of damaging the door with this approach.
Most European-style hinges have a spring-loaded feature that closes doors automatically, so a doorstop is essential. I made my stops adjustable to allow the fit of the doors to be precisely tweaked while also being simple. A 1⁄2"-thick slice of 1"-dia. dowel with an off-centre screw hole does the trick nicely. Mounted to the inside top of the door opening, you simply rotate the disc, then lock it down when the door closes just the right amount.
Since the sideboard has only one drawer, I thought I would make handcut dovetail joints, but there are other op-tions. A simple box with butt-joined corners works fine with a 3⁄4"-thick drawer front screwed on from behind. You could also build finger joints or rabbets.
For a more elegant look, use thinner stock for the drawer sides and back. I used 5⁄8" maple for the sides and back and 1⁄4" maple ply for the bottom. The drawer is simply a snug-fitting box that slides into an opening. Be prepared to plane the edges of your drawer to get a good fit after it’s built. In place of drawer stops, I set a couple of widely spaced wood screws in the drawer back. By adjusting the amount of screw that extends beyond the drawer, it’s easy to adjust the drawer so it stops at just the right spot when closed.
Connecting all the parts you’ve worked on so far is easy. That’s the beauty of this design. Lay your carcass upside down on a flat surface and fasten the leg assemblies to both sides using pocket screws. Ensure the cabinet is set back 1⁄8" from the front of the front legs. Apply glue to the mating surfaces and clamp the pieces together before drilling holes and driving pocket screws. You’ll need a pocket screw at the front and back edges, through the bottom of the carcass and into each leg. Predrill a hole for a plug and install a screw in the front and back edges on either end, straight into the legs.
When the glue sets, flip the piece over and install pocket screws through the carcass top into each leg. Plug the screw holes and trim the plugs flush.
Make the bottom rail, first cutting it to length so it fits exactly between the legs on the front of the cabinet. Use a bandsaw, jigsaw or tablesaw to prepare a pattern, then clean up the edges using a plane, file or scraper. Sand the rail, then glue it in place with a row of biscuits, so that it sets back 1⁄8" from the front of the carcass. When the glue is dry, install a couple of pocket screws through the back of both ends into the legs.
The top is made from solid wood. Glue 3⁄4"-thick boards with biscuits to keep the boards aligned. You could use a plywood panel for the top, as long as you effectively cover its edges. You might try wood strips for the front and back edges and faux breadboard ends made from solid wood, applied with biscuits and glue. After you’ve cut the top to size, it’s time to cut the back rail. I made mine on the same tapering jig I used for the legs. Secure the back rail to the top with biscuits and screws.
Secure the top to the cabinet from the inside with 11⁄4"-long screws. Dark brown flooring screws are strong and will disappear against the dark brown stain. Drill holes through the underside of the carcass top and countersink them on the inside so the screws won’t interfere with the operation of the doors. Elongate the holes at the front by rocking the drill back and forth. The resulting oval holes allow the top to expand and contract. Leave the holes at the back alone so that movement will only happen at the front of the sideboard.
Build some shelves for the compartments and cut glass stop strips to hold the glass in the door. I used iron-on veneer tape for the shelves to hide the plywood edges. Do the sides first so that the tape on the front covers the end-grain of the veneer on the sides.
The middle door requires 1⁄4" x 5⁄16" strips of wood to secure the pane of glass. Mitre each piece to fit, then hold the strips in place using finishing nails. Don’t use any glue in case you need to take the strips out to replace the glass.
Cut a piece of 1⁄4" plywood for the back, then prefinish it and set it aside until the rest of the cabinet is finished.
I used a multi-step process to achieve the colour and sheen of the finish I created on my sideboard. After staining the wood with aniline dye in a traditional fumed oak colour, I stained everything again with Old Masters Wiping Stain in Dark Walnut. Over that, I sprayed two coats of polyurethane, then finished up with a coat of Dark Brown Briwax. I created the simulated glass leading with a product called Decra Led.
| Part | Material | Size (T x W x L*) | Qty. |
|---|
| Legs | oak | 1 3/4" x 1 3/4" x 35 1/4" | 4 |
| Leg-front veneer | oak | 1/8" x 2" x 35 1/4" | 4 |
| Outer side panels | oak ply | 3/4" x 12 1/2" x 22 1/2" | 2 |
| Carcass top and bottom | oak ply | 3/4" x 15 1/2" x 39" | 2 |
| Vertical dividers (sides) | oak ply | 3/4" x 15 1/2" x 18" | 4 |
| Drawer divider | oak ply | 3/4" x 15 1/2" x 12" | 1 |
| Bottom rail | oak | 3/4" x 3" x 39" | 1 |
| Top | oak | 3/4" x 17" x 44 1/2" | 1 |
| Top rail | oak | 3/4" x 3" x 42 1/2" | 1 |
| Cabinet back | oak ply | 1/4" x 19 1/2" x 39" | 1 |
| Glass door stiles | oak | 3/4" x 2" x 13 1/4" | 2 |
| Glass door rails | oak | 3/4" x 2" x 9" | 2 |
| Glass stop strips | oak | 1/4" x 5/16" x 12" | 4 |
| Outer doors panels | oak or oak ply | 1/4" x 9" x 15" | 2 |
| Outer door stiles | oak | 3/4" x 2" x 18" | 4 |
| Outer door rails | oak | 3/4" x 2" x 9" | 4 |
| Drawer front | oak | 3/4" x 4" x 12" | 1 |
| Drawer sides | maple | 5/8" x 4" x 15" | 2 |
| Drawer back | maple | 5/8" x 4" x 12" | 1 |
| Drawer bottom | maple ply | 1/4" x 11 1/2" x 14 1/2" | 1 |
| Edge strips | oak | 3/4" x 1" x 180" | 1 |
| Glass cut to fit door | 1/4"-thick | 1 | |
| European hinges | inset-style | 6 | |
| Shelf pins | 5mm-dia. | 6 | |
| Shelves | 3/4" x 14 1/2" x 12" | 2 | |
| Door pulls | Lee Valley #02G17.01 | 4 | |
| Doorstops | dowel | 1"-dia. x 1/2" | 3 |
* Length indicates grain direction
Recommendations

canadianhomeworkshop.com is part of the Blue Ant Media
Canada Network
© 2024 Blue Ant Media
More information
Social Media & RSS


Our other sites


No comments
To leave a comment, please log in
Don't have an user account? Register for free