Learn how to install a handy benchtop vise
Learn how to install a handy benchtop vise
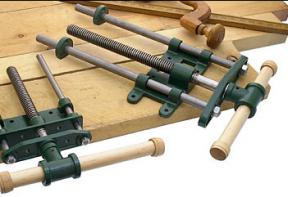


In the March 2010 issue of Canadian Home Workshop, I wrote about how to build my movable shop benches (“Dynamic Shop Duo,” page 22). On one of them, I installed a vise that I bought from Lee Valley (#70G08.01), a standard front-mounted model. I prepared for the installation by gluing a 3/4″-thick plywood mounting plate to the underside of the MDF substrate, and also by laminating a 3/4″-thick maple spacer to the interior face of the skirt. These extra layers are necessary to accommodate the full length of the vise mounting screws.
After following the drilling template provided by the manufacturer to locate access holes for the guide rods and screw shaft, I bolted the vise to the underside of the top. I created the jaws for my vise by laminating two layers of 3/4″-thick solid maple. Before gluing the layers together, I rounded the edges with a 3/4″-radius roundover bit. The procedure for mounting the vise you’ve selected for your bench may be different, so study the manufacturer’s directions carefully before you begin installation.
To leave a comment, please log in


No comments