Video: Make your own shop-cut veneered plywood
Give your projects unique panels with this technique.
Sometimes the stability and strength of hardwood-veneered sheet goods is perfect for a particular project, but the material may not come in the species you need. Or maybe you’re leery about using ready-made veneered ply in which beauty is only as thick as a couple of pieces of paper. Perhaps you don’t want to spend $150 on a full sheet of bookmatched quartersawn oak plywood when all you really need is one small piece of the stuff.
Making your own shop-cut veneered panels is the perfect solution to challenges such as these; once you try it, you’ll probably end up using this technique again and again.
In short, you rough-cut solid wood to about 3/8″ thick, then edge-glue these pieces together into thin panels. Next, run the panels through a thickness planer so joints are flat and smooth, then glue the panels to a plywood or particleboard substrate. These steps form the veneering process, and although they sound simple, there are tricks you need to know to succeed.
The process begins by resawing lumber to make your own thicker-than-usual veneer stock. You don’t need a bandsaw for this step; I find my tablesaw works well. Start by selecting a piece of wood 3/4″ to 1″ thick with an attractive grain pattern. Is your wood rough? Joint one face, then an edge, before moving over to your tablesaw to slice the wood in half on edge. Most of my veneer panels are 6″ to 10″ wide when complete, so I start with boards that are 3″ to 5″ wide, sawing each one in half in two passes. Saw along one edge, flip the wood over, and then complete the cut from the other side. Each piece will be approximately 3?8″ thick, depending on how wide your tablesaw blade is.
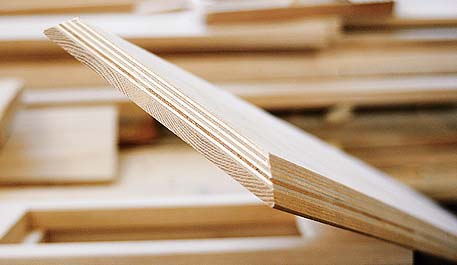
Stunning, bookmatched grain patterns are a benefit of creating your own veneered panels. Bookmatching refers to wood grain patterns that fan out in a mirror image along each side of a central glue line. Each board you’re splitting on your tablesaw will form a bookmatched pair, and you’ll get beautiful results if you deal with them carefully.
Although you could apply each piece of shop-cut veneer to your substrate separately, as with conventional, thin veneers, there’s an easier way. Identify the edges of each veneered pair that look best together, joint these edges, then glue and clamp the pieces together as you would wider panels, making sure the grain elements align perfectly. Remove the wood when the glue is half hard, scrape off any squeeze-out and then run the panels through a thickness planer to even up the joints. The wood’s thickness doesn’t really matter; although, I do find the veneer starts to bend and cup if you plane it thinner than 1/4″.
My favourite substrate for veneer is 1/2″-thick cabinet-grade plywood. You could also use particleboard or MDF of the same thickness if you want to save money in exchange for more dust. Either way, saw your substrate to a size larger than the veneer panels you have (which are themselves larger than the final parts you’re making), then get ready for glue-up.
Carpenter’s glue is perfect for bonding veneer to a substrate, but you need to spread a lot of it very evenly over the entire surface. I prefer to apply glue with a miniature paint roller, spreading a generous coat to the back face of the veneer only. You don’t need to put any glue on the substrate. Next, flip the veneer over, centre it on your substrate, and use a pin nailer or tiny hammer-driven brads to stop the veneer from sliding around. One pin in each diagonally opposed corner is all you need. This seemingly small detail is vital for keeping the veneer in place during the clamping phase that comes later. Grab your next piece of veneer and repeat the gluing and stacking process.
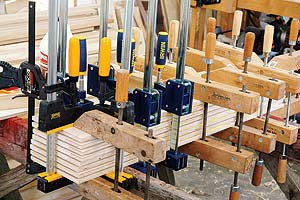 Once you have a stack of veneer/substrate pairs, cap the pile with one more piece of substrate (without glue) to distribute the clamping pressure evenly. How many clamps do you have? You’re going to need a lot. Tighten clamps, starting at both sides of one end and working toward the other. There will be squeeze-out, but don’t worry; although it drips down the edges of the substrate stack, it won’t glue the pieces together. Allow this big, tall carpenter’s club sandwich to sit undisturbed for a day before removing clamps.
When it’s time to trim the panels to final size, keep the precious centre line of your bookmatched veneer in the middle after final trimming. Begin by marking the joint line of each veneer panel on the plywood, then measure from this mark to each side to determine where each edge of the veneer panel needs to be sawn to preserve the central joint line.
Master the skills of preparing and applying your own shop-cut veneer and you’ll be able to add custom flair to your woodworking projects.
To leave a comment, please log in


No comments