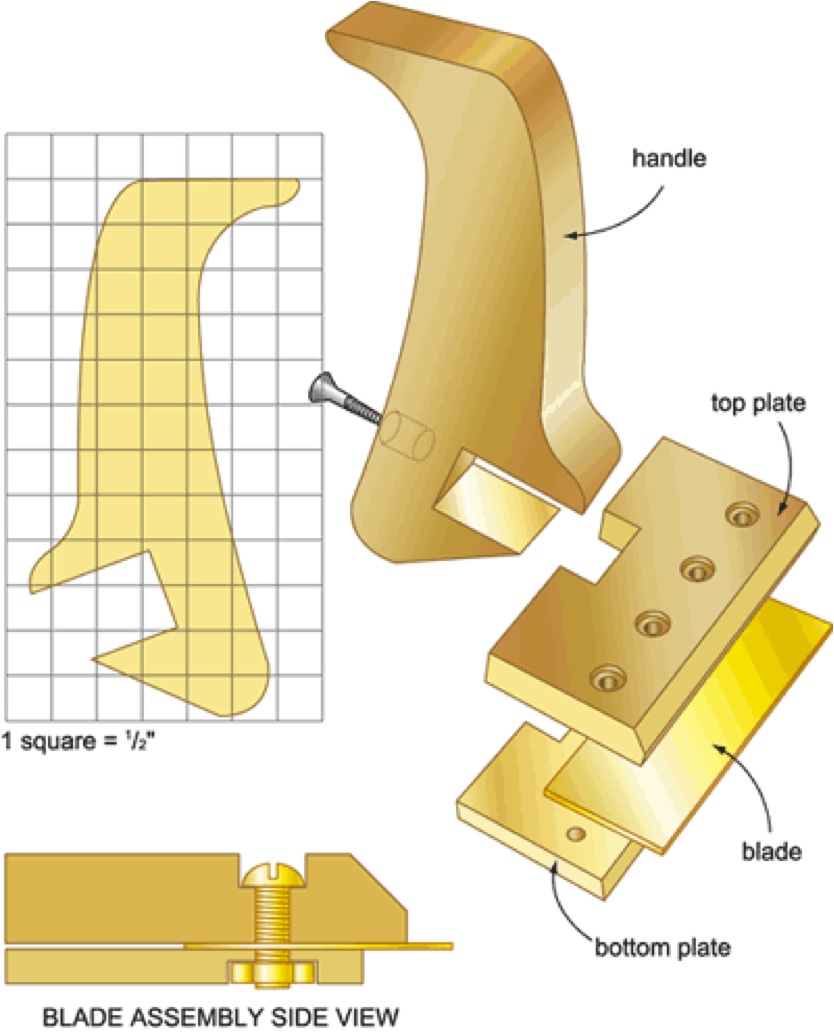
The idea to improve a standard ice scraper has been floating around in my head for some time now. The unique shape of this scraper positions the heel of your hand directly behind the blade, which puts more power behind the tool. Combine this with a brass blade, which is harder than plastic (but not so hard as to scratch the glass) and even the toughest windshield ice is defenseless in its path. I used solid cherry for this project, but any tightly grained hardwood will do. Three thicknesses of stock are required: 3/4″, 1/2″ and 1/4″. Resaw these using a tall fence on a bandsaw or tablesaw.
The handle for the scraper is cut from 3/4" stock using a bandsaw. You could transfer my pattern directly to your wood and cut away, but since this project needs to fit your hand, you may wish to experiment with the design. Cut a few handle shapes from some pine to see how they feel. The final handle needs a 1/4" roundover on the entire perimeter of each side. I used a table-mounted router with a guide bearing to do this, but careful sanding is an alternative. Cut the notch for the blade assembly next.
Use a scribe to lay out the blade on the brass stock. I used the factory-sheared edges of the brass for the front edge and one side of my blade, and the other sides were cut with a hacksaw. Round the sharp corners and smooth the cut edges with a file. Cut the top plate to size from the 1/2" cherry and the bottom plate from the 1/4" stock. I used a table-mounted router with a 45° chamfer bit to machine the front edge of the top plate. It's easiest to drill the three components of the blade assembly all at once. Temporarily assemble the pieces using double-sided tape. Using a drill press with a Forstner bit, drill the 3/8" countersinks on the top plate first. Then move to a 3/16" twist bit to drill the holes right through all three pieces. Finally, flip the whole thing over and drill holes for the countersunk nuts with a 1/2" forstner bit. Pop the blade assembly apart and remove the tape. Then reassemble using the brass nuts and bolts. To make the scraper easier on bare hands (and to prevent any errant scratches on the paint), it is important that all parts of the brass fasteners are below the surface of the wood. Once tightened, I ground the protruding ends of the bolts flush with the nuts.
Once the blade assembly is complete, cut the notch that will receive the handle. The handle is attached to the blade assembly using epoxy and a single stainless steel screw. Drill a 3/8" countersink in the back of the handle. Take care to ensure the screw goes into the top plate of the blade assembly rather than in between the top and bottom plates. To finish off the scraper, I applied two coats of Swedish penetrating oil, followed by two coats of satin polyurethane. While this scraper is much too nice to toss in the glove box, please refrain from hanging it from the rearview mirror.
| Part | Material | Size (T x W x L*) | Qty. |
|---|
| Handle | cherry | 3/4" x 4" x 6 1/2" | 1 |
| Top plate | cherry | 1/2" x 2 1/4" x 4" | 1 |
| Bottom plate | cherry | 1/4" x 2" x 4" | 1 |
| Blade | brass | 1 1/2" x 4" | 1 |
| Nuts and bolts | brass | 3/16" x 7/8" | 4 |
* Length indicates grain direction
Recommendations

canadianhomeworkshop.com is part of the Blue Ant Media
Canada Network
© 2024 Blue Ant Media
More information
Social Media & RSS


Our other sites


No comments
To leave a comment, please log in
Don't have an user account? Register for free