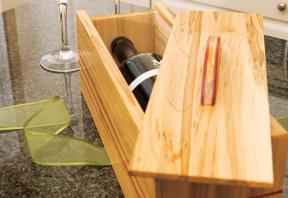
The wine lovers on your shopping list will be delighted when they re-ceive a bottle of a quality vintage packaged in one of these handcrafted presentation boxes. To achieve a charming, Old World appearance, I used a specialty lumber called wormy maple (sometimes called ambrosia maple). As the name suggests, the attractive marbled colour is created by an army of tiny worms that attacked the tree prior to harvesting. Don’t be concerned, though: the worms are long gone.
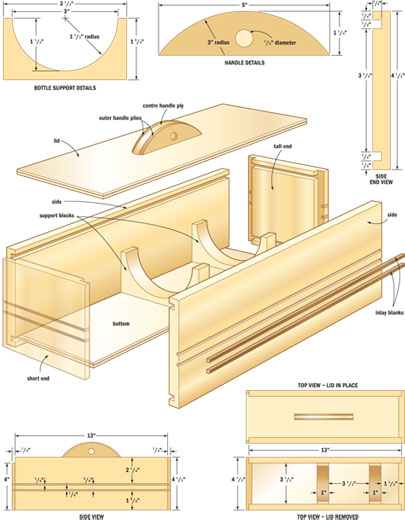
Wine bottles come in a variety of shapes and sizes, so take measurements of your gift bottle before you begin. My box was designed to fit a 750-ml bottle that's 12" long and 3" in diameter. Get started by cutting out the sides and ends of the box from 1/2"-thick material. Note that one end of the box is 1/2" shorter than the other, to provide clearance for the sliding lid.
Next, prepare 1/2"-wide x 1/4"-deep rabbets on the edges of the end panels to join the corners. The bottom panel sits in 1/4"-wide x 1/4"-deep dados that's located 1/4" from the bottom edges. You'll also need another dado 1/4" down from the top of the box, which forms a channel for the lid. I completed all of this work using a dado blade installed in my tablesaw, but a straight bit and a table-mounted router with a fence also gets the job done. Next, cut the bottom panel and the lid to size from 1/4"-thick material. Apply glue to the bottom dados and corner rabbets then assemble with the bottom panel in place.
To enhance the box exterior, I added two narrow bands of decorative inlay made from a contrasting wood. I used purpleheart, but any material that complements the appearance will do. (See “Adding Stripes” on next page for help with this step.)
To create the support blocks that cradle the bottle inside the box, you need to make a couple of internal bulkheads. Lay out a curved recess on the top of each blank that's equal to the diameter of your wine bottle. Use your bandsaw to make the cuts, then remove the saw marks with a drum sander. Glue the support blocks into place; exact positioning depends on the shape and size of your particular wine bottle.
The lid's handle is another opportunity to get creative by adding a personal touch to the project. I made my handle by laminating a piece of 1/4"-thick wormy maple between exterior layers of purpleheart, then I cut a gentle arc and rounded the top edge with sandpaper. To complete the design, I drilled a 3/8"-deep hole on either side using a 1/2"-diameter Forstner bit, then filled the openings with maple plugs made using a plug cutter installed in my drillpress. After sanding the plugs flush, glue the completed handle to the top of the lid.
I finished the box by applying three coats of wipe-on polyurethane to the exterior only. Leave the inside bare to avoid odour buildup when the box is closed. The natural finish does a nice job of accenting the dark purpleheart inlay so it stands out prominently.
Once the finish is dry, you can add your bottle of wine, then proudly present this gift box with its delicious treat inside.
These steps duplicate the inlay pattern I created for my gift box. You can follow my lead or create your own design. Or you can skip this step and leave the box sides plain.
First, create four 1/8"-wide x 1/8"-deep connected grooves around the sides and ends of the box to accept the wood inlay strips. A standard saw blade makes a 1/8"-wide swath, so all you need to do is set the blade height and position the fence to prepare for these cuts. Locate the fence 1 5/8" from the blade and complete the first pass on all four sides of the box, with the bottom face running firmly against the fence. Relocate the fence 2 1/8" from the blade and repeat the procedure to form a second set of four connected grooves parallel to the first.
Take some contrasting 1/4"-thick material that's roughly 2" longer than your side panels and slice 1/8"-wide strips from the edge to fit the grooves. For safety reasons, make these cuts so that the narrow strips fall to the waste side of the blade. Be sure to use a zero-clearance insert in your tablesaw to prevent the wood slices from dropping down through the blade opening. Although this technique requires you to reposition the fence after each slice, it's much safer than working with the fence set 1/8" away from the blade. The way I did it here, there's no chance the thin inlay strips can get dangerously trapped between the fence and the blade.
I made my inlay a little on the fat side to start with, then I taped the ends to the bench and lightly sanded the sides with 100-grit sandpaper wrapped around a wood block to achieve a perfect fit. If you bevel the edge slightly as you sand, the strips are easier to install without gaps.
Using a sharp utility knife, cut the strips to final length with 45º mitres on adjoining ends. Apply a little glue to the bottom and sides and press the inlay into the slots. Lightly tap them into place with a wood mallet if a little extra persuasion is required. After the glue dries, scrape or sand the excess material protruding from the slots until the inlay sits flush with the box sides.
This box is the type of project that can be produced in large quantities if you have many wine connoisseurs on your holiday shopping list. I recommend that you build one box from start to finish as a prototype before shifting into high-production gear. After all, you don't want to wait until the parts for all your boxes are ready for assembly before finding out the bottles won't fit.
| Part | Material | Size (T x W x L*) | Qty. |
|---|
| Sides | maple | 1/2" x 4 1/2" x 13" | 2 |
| Tall end | maple | 1/2" x 4 1/2" x 4 1/2" | 1 |
| Short end | maple | 1/2" x 4" x 4 1/2" | 1 |
| Bottom | maple | 1/4" x 4" x 13" | 1 |
| Lid | maple | 1/4" x 4" x 13 1/4" | 1 |
| Support blocks | maple | 1" x 1 3/4" x 3 1/2" | 2 |
| Centre handle ply | maple | 1/4" x 1 1/4" x 5" | 1 |
| Outer handle plies | purpleheart | 1/8" x 1 1/4" x 5" | 2 |
| Inlay blank | purpleheart | 1/4" x 3" x 15 1/2" | 1 |
* Length indicates grain direction


Recommendations

canadianhomeworkshop.com is part of the Blue Ant Media
Canada Network
© 2024 Blue Ant Media
More information
Social Media & RSS


Our other sites


No comments
To leave a comment, please log in
Don't have an user account? Register for free