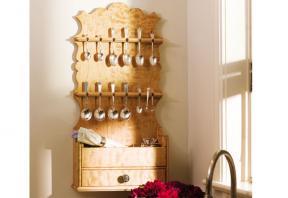
People love the opportunity to show off their hard-won possessions. That’s probably one reason why spoon racks have been popular for hundreds of years. The original rack held a collection of Canadian-made pewter spoons and included a drawer for broken utensils until they could be fixed by a travelling repairman. While most 19th-century racks were similar to this 1845 design from Lanark County in Ontario, the scrollwork is more complex than on others. It may have been made for a more elaborate home or displayed in a church. The builder clearly worked carefully at cutting the wavy scrolls precisely, without a power tool in sight.
The original spoon rack was made from wavy birch, which is plentiful in Central Canada, but harder to find on the West Coast where I live. Instead, I chose figured maple. It has a similar colour and appearance, but it’s easier to find.
You may be thinking that this rack is the ideal piece to hold your collection of small souvenir spoons; however, the original was made for regular-size spoons. To adjust this project for smaller spoons, tweak the size of the cutouts by experimenting with scrap first.
Begin by milling enough boards to make up the back panel. The back is a prominent part of the project, so take your time. If you're using figured wood, as I did, do your best to line up the grain where these boards meet.
After milling your back boards to 3/4" thick and jointing the edges square, edge-glue a blank for a back panel that's at least 14" wide. Once the glue has set, remove the clamps and scrape any beads of glue from the joints. Try to do this within a couple of hours and the glue will peel away from the wood easily. If you wait too long, you run the risk of tearing off chunks of wood along with the hardened glue.
It's important that the scrollsawn edges of the back panel end up square and crisp in the finished project. That's why you should sand both sides of the back panel now, before sawing the scrollwork on the edges. Begin with a 100-grit abrasive, then move up to 120 and then 150 grit.
Trim the panel to its final width on your tablesaw, then transfer the curved pattern to your wood.
At this stage, you have a decision to make. If you'll be making only one rack, go ahead and glue the paper pattern to your back panel blank, then saw through the paper. But be warned; chances are you'll get requests for more racks.
That's why it makes sense to prepare a wooden template for the scrollwork on the back panel. I used 1/4"-thick MDF (medium-density fibreboard) for mine.
When fastening or tracing your template onto your back piece, make sure the back of the spoon rack is symmetrical. Find the vertical centre, then draw a line from top to bottom. Place your half-pattern on the left side of the centre line and trace it, then flip the pattern over and trace the other side.
When it comes time to saw the back, think before you switch on the scrollsaw. Handling a large piece of wood on this machine can be tricky, so plan your approach and decide how you will tackle the cuts beforehand.
After cutting away the waste wood around the traced outline, the cut edges have to be sanded to remove all of the saw marks. I used a set of drillpress sanding drums and a few files for this job. The drums make it easy to achieve a fair, flowing curve, and the files allow you to smooth the inside corners easily.
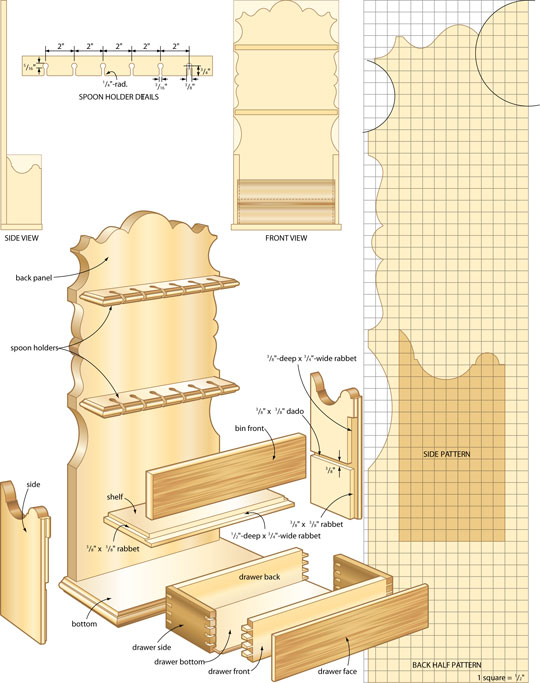
Cut two blanks for the sides, then sand them up to 150-grit paper, as you did with the back. The sides also call for decorative scrollsaw work following the pattern. Prepare a template and trace the pattern for the sides, but don't cut off the curved waste just yet. You should finish shaping all the edges and cut the required rabbets first. These accommodate the shelf, bin front and drawer front. A square piece of wood is easier to hold and manipulate on a router table, so save the scrollsaw work until the end.
To mill the decorative bead that is situated on the front edges of the sides, use two passes with a bearing-guided router bit. Cut one side, then flip the board over and do the other with the bearing riding on the newly-routed bead. This isn't a difficult job, but there is a trick you should know about.
Light-coloured hardwoods such as maple have a tendency to burn when routed, and the discolouration can be hard to remove with sandpaper. My single-speed router is particularly bad for this. It has no mechanism to slow down bit rotation, so friction and heat build up, causing a problem when working with maple and cherry.
To overcome this challenge, I've come up with a method that almost eliminates burning. I use a fence in conjunction with the piloted bit, setting the fence to take 85 per cent of a full cut. I make this partial cut, then observe how the wood reacts to the router. Next, I reset the fence to take approximately one-half of the remaining wood with the next cut. Now, here's the trick: for the final cut, the third one, set the bearing just proud of the fence before making the final routing pass. Since this only removes a thin shaving of wood, heat buildup is minor. With a sharp router bit, your cut will be burn-free and virtually flawless.
Now it's time to cut shelf dados across the width of both side pieces. These grooves receive the tongue on the ends of the shelf. I used a radial-arm saw for this work, but a tablesaw would work just as well. After cutting the dado, set up a 3/8" spiral bit in your router table to create the stopped rabbets on the front edges of the sides. You'll need to set up ends stops to limit the movement of the part on the router table because it will be face down, obscuring the cutter and the layout lines. Make one pass that extends over both the drawer and bin front areas. The bin front is a full 3/4" thick, so you'll need to make its rabbet in two passes.
With all the shaping done, you can now cut the curved edges on the sides using your scrollsaw. Smooth away any saw marks using the drum sanders and files as you did earlier.
Choose which edge of the shelf will be the bottom front edge, then use a bearing-guided beading bit to rout a bullnose profile along this edge.
To allow the shelf to take up just 1/4" of space on the front, while the rest of it is 3/4" thick, the shelf needs a 1/2"-deep x 3/8"-wide rabbet cut on the front and a 3/8" x 3/8" rabbet along each end. Rout your rabbets using a spiral bit.
Cut the bottom piece to size and pre-sand both faces for finishing. I used a canoe bit and a dish-carving bit to create the profile on these edges. Use the canoe bit centred on the thickness of the board, creating a bead that runs along the ends and the front face. Set up a dish-carving bit in the router table and cut a cove on either side of the bead. When routing adjoining edges like this, always cut the end-grain first, then work around to the edge-grain. This way the splintering and tearout that inevitably happen when routing end-grain will be milled out when you rout the smoother-cutting front edge.
The two spoon holders receive the same edge-routed treatment as the bottom, but first create the slots that each spoon will hang from. Each slot is 5/16"-wide x 3/4"-long, on two-inch centres. The easiest and cleanest way to cut them uniformly is to use a spiral bit in your router. A shop-made plywood jig with a guide bushing works well. If you've gone to the trouble of making MDF templates for the sides and back, then it makes sense to repeat the process for the spoon slots. The final step for the spoon holders is to profile the sides and edges in the same manner as the bottom.
The bin front and the drawer face should be cut from one piece of wood for best effect. After all, these two parts are one above the other. The bin front is a full 3/4" thick, but resaw the drawer face using a bandsaw and mill it down to 3/8" thick. Create a 1/8" roundover on all four face edges of both parts. Sand both faces of the bin front, but only the front face of the drawer front.
The drawer box itself is made of 3/8"-thick stock all around, and I chose to cut traditional dovetail joints to maintain the historical integrity of the design. Use the drawer joinery method you are comfortable with.
Sand and stain the inside edges of the drawer box and the entire bottom panel before assembling the drawer. After the glue has set, sand the exterior of the drawer box and finish all the remaining surfaces except the front.
Give all project parts a final sanding and apply a coat of penetrating oil to all nonglued surfaces. After wiping off the excess oil, begin assembly by gluing and clamping the two sides and the shelf. In order to keep the assembly square, cut a filler block to occupy the opening the drawer will sit in. Set the assembly aside until the glue is fully cured. To attach the bottom, drill and countersink the holes for brass screws.
To allow for cross-grain movement between the back and the drawer/bin assembly, there should only be one screw through the bottom into the back, at the centre. The other screws should all go into just the sides. I found it easiest to lay the back on my workbench and clamp the shelf/side assembly to it. Then it's a simple matter to push the bottom panel into place, drill pilot holes and drive screws. Do the one in the centre of the back first. Once that screw is set, drill the others.
While everything is still clamped in place, mark the top and bottom faces of the shelf, then remove the project from the clamps and drill mounting holes. The two outer holes must be elongated to allow for the seasonal expansion and contraction of the back. Mount the spoon holders in a similar manner, with elongated screw holes and no glue. Run a bead of glue in the rabbet that receives the bin front, then set this part in place. Glue the drawer front to the drawer box now as well. Make it easy to hang up the spoon rack by routing a slot across the back face of the project with a keyhole router bit. This will carry the weight of the rack, but to keep it from swinging, drill a countersunk hole through the back, behind the drawer. When it comes time to mount the project on the wall, drive a screw here, into the wall. With all the assembly work complete, rub the entire project with fine steel wool (#000) and apply another coat of oil to even out the finish. One final rub-down with more steel wool, followed by a few coats of wax, and your new family heirloom is ready to assume a prominent place on your kitchen wall, complete with your best collection of spoons.
Much of the appeal of old Canadian country furniture comes from the bold, rich paint colours that builders often applied. When most of your furniture is constructed of the same species of a relatively plain wood such as pine, your home might look a bit bland, so it's no surprise that a lot of antique Canadian country furniture was painted or stained. Rich dark reds, dark blue-greens, deep yellows and emerald greens were popular in many styles of furniture, although other colours were also used.
While natural pigments were often used to make paint, the blending of these pigments from a wide variety of chemical compounds could clearly be called chemistry by the 1600s. When Europeans landed in the New World, however, special pigment mixes were not always available or affordable.
Milk paint, in a variety of forms, has been around since ancient times. It is relatively easy to make: it's simply a mix of water, milk protein (casein), lime and pigment to give it colour. The protein helps the mixture penetrate the surface of the wood and bind to it. The result is long-lasting colour that is permeable, so it allows the wood to breathe without cracks in the paint layer. Pigments were often the product of a chemist, but there were natural options as well. –Jessica Ross
Yellow.....Ochre (impure iron ore)
Red.....Red clay
Maroon.....Staghorn sumac berries
Black.....Coal, soot
Green.....A mix of yellow and blue pigments
Blue.....Indigo (a plant in the pea family)
White.....Chalk or zinc
Brown stain.....Oil from butternut tree husks.
Here are a few of the best museums to see original antique Canadian furniture and get information on woodworking in Canada:
Canadian Museum of Civilization, Hull, Quebec
Glenbow Museum, Calgary, Alberta
MacLachlan Woodworking Museum, Kingston, Ontario
McCord Museum, Montreal, Quebec
Museums in Dartmouth, Nova Scotia
Newfoundland Museum, St. John's, Newfoundland
Royal B.C. Museum Cultural Precinct, Victoria, British Columbia
Royal Ontario Museum, Toronto, Ontario
Upper Canada Village, Morrisburg, Ontario
Yorkton Western Development Museum, Yorkton, Saskatchewan.
| Part | Material | Size (T x W x L*) | Qty. |
|---|
| Back panel | maple | 3/4" x 13 5/8" x 29" | 1 |
| Sides | maple | 3/4" x 4 1/2" x 9" | 2 |
| Bottom | maple | 3/4" x 5 5/8" x 14 1/4" | 1 |
| Shelf | maple | 3/4" x 4 1/2" x 12 5/8" | 1 |
| Bin front | maple | 3/4" x 3" x 12 5/8" | 1 |
| Drawer face | maple | 3/8" x 2 1/2" x 12 5/8" | 1 |
| Drawer front/back | maple | 3/8" x 2 1/2" x 11 15/16" | 2 |
| Drawer sides | walnut | 3/8" x 2 1/2" x 4 1/8" | 2 |
| Drawer bottom | maple | 3/8" x 3 5/8" x 11 7/16" | 1 |
| Spoon holders | maple | 5/8" x 1 3/8" x 13 1/4" | 2 |
| Knob | pewter | 1 3/16" | 1 |
* Length indicates grain direction

Recommendations

canadianhomeworkshop.com is part of the Blue Ant Media
Canada Network
© 2024 Blue Ant Media
More information
Social Media & RSS


Our other sites


No comments
To leave a comment, please log in
Don't have an user account? Register for free